In this article I would like to cover setting up the X11 Window System on FreeBSD.

You may want to check other articles in the FreeBSD Desktop series on the FreeBSD Desktop – Global Page where you will find links to all episodes of the series along with table of contents for each episode’s contents.
I always get the impression that the X11 configuration/setup seems to be the seen as hard or weird. I will try to gather all useful information about that topic regarding the FreeBSD operating system. A lot of that is covered in the FreeBSD Handbook – 5.4. Xorg Configuration – section.
BIOS or UEFI
First things first, if You find a device that is not supported by any ‘accelerated’ driver like ‘intel‘ or ‘nvidia‘ You would use ‘vesa‘ driver (Video Electronics Standards Association) while booting in BIOS mode and You will use ‘scfb‘ driver (System Console Frame Buffer) while booting on UEFI mode. This can be checked by machdep.bootmethod sysctl(8) parameter.
% sysctl machdep.bootmethod
machdep.bootmethod: BIOS
This way You will know if you will use ‘scfb‘ driver or ‘vesa‘ driver when troubleshooting or when just running the ARM system on which ‘scfb‘ will be used.
Packages
We will install the X11 server, the XDM login manager, the XTERM terminal emulator and the Openbox window manager. We will also install the Intel graphics card driver. To achieve that type the command below.
# pkg install xorg xdm xterm openbox xf86-video-intel
Of course You will need to have network connection configured but we covered that in earlier parts.
Group
To have hardware accelerated X11 You will also need to add your regular user to the ‘video‘ group.
# pw groupmod video -m username
Login Class
Remember to also add UTF-8 as the default encoding (charset and lang parameters) in the /etc/login.conf file as show below. Also, after adding them, run the cap_mkdb /etc/login.conf command as root and relogin with your regular user.
Below are shown the lines that need to be added to the default: profile in the /etc/login.conf file.
(...)

 default:\
         :passwd_format=sha512:\
         :copyright=/etc/COPYRIGHT:\
         :welcome=/etc/motd:\
         :setenv=MAIL=/var/mail/$,BLOCKSIZE=K:\
         :path=/sbin /bin /usr/sbin /usr/bin /usr/local/sbin /usr/local/bin ~/bin:\
         :nologin=/var/run/nologin:\
         :cputime=unlimited:\
         :datasize=unlimited:\
         :stacksize=unlimited:\
         :memorylocked=64K:\
         :memoryuse=unlimited:\
         :filesize=unlimited:\
         :coredumpsize=unlimited:\
         :openfiles=unlimited:\
         :maxproc=unlimited:\
         :sbsize=unlimited:\
         :vmemoryuse=unlimited:\
         :swapuse=unlimited:\
         :pseudoterminals=unlimited:\
         :kqueues=unlimited:\
         :umtxp=unlimited:\
         :priority=0:\
         :ignoretime@:\
+        :charset=UTF-8:\
+        :lang=en_US.UTF-8:\
         :umask=022:
(...)
The diff(1) after/before modification looks like that.
# diff -u login.conf.ORG login.conf
--- login.conf.ORG      2018-05-22 07:10:09.864831000 +0200
+++ login.conf  	2017-07-07 04:47:04.643412000 +0200
@@ -46,6 +46,8 @@
        :umtxp=unlimited:\
        :priority=0:\
        :ignoretime@:\
+       :charset=UTF-8:\
+       :lang=en_US.UTF-8:\
        :umask=022:
The UTF-8 encoding – same as in the lang parameter in the /etc/login.conf file – must be added at the beginning of your ~/.xinitrc file, like that:
% grep LC_ALL ~/.xinitrc
# SET PROPER locale(1) with LC_ALL VARIABLE.
  export LC_ALL=en_US.UTF-8
Kernel Module
In 2010 Intel introduced Nehalem architecture which have integrated GPU in the CPU (and memory controller which AMD had in CPU since 2003). This means that most computers/laptops/servers (Intel has about 80% market share) will have integrated GPU which should be supported by the X11 ‘intel‘ driver and:
/boot/kernel/i915.kofrom base system (older)/boot/kernel/i915kms.kofrom base system (newer)/boot/modules/i915kms.kofrom ‘drm-next-kmod‘ package
The ‘drm-next-kmod‘ package is available for FreeBSD 12-CURRENT development branch and upcoming FreeBSD 11.2-RELEASE (currently at BETA2 stage) about which You can read here on FreeBSD Mailing Lists on https://lists.freebsd.org/pipermail/freebsd-stable/2018-February/088406.html and https://svnweb.freebsd.org/ports?view=revision&revision=462202 accordingly.
You will probably be using the builtin KMS module which is the /boot/kernel/i915kms.ko file. You may configure loading of this module in either /boot/loader.conf (loaded at boot menu) or in the /etc/rc.conf main FreeBSD configuration file – which will load modules during the startup process. I prefer the second option as it is faster for FreeBSD system to boot while loading the kernel modules from the /etc/rc.conf file along with starting needed services then lading them one by one from /boot/loader.conf file. To keep system startup time to minimum we will have only one kernel module configured to load from the /boot/loader.conf file – the ZFS module with zfs_load=YES line.
If you found yourself with situation that KMS modules from the base system will not support your graphics card then You will have to try the ‘drm-next-kmod‘ package for latest support of Intel graphics chips, that sometimes requires running FreeBSD CURRENT version which is not a problem, you will get all the new stuff instantly as a bonus 😉
To add the KMS (Kernel Mode Setting) Intel module loading into the /etc/rc.conf file put the line below into it.
# KERNEL MODULES
  kld_list="${kld_list} i915kms"
We can also add other useful kernel module loading such as fuse (for alien filesystems), aesni (for encryption acceleration if You CPU has these extensions) geom_eli (for the encryption itself) or coretemp (for the temperature sensor). I will cover all of these kernel module in the future series with exact explanation what are they for.
With all of them the /etc/rc.conf kld_list variables will look like that:
# grep kld_list /etc/rc.conf
  kld_list="${kld_list} i915kms aesni geom_eli"
  kld_list="${kld_list} fuse coretemp cpuctl"
In case of need to use ‘drm-next-kmod‘ module instead of the base system one, your /etc/rc.conf file would look like that one below.
# grep kld_list /etc/rc.conf
  kld_list="${kld_list} /boot/modules/i915kms.ko aesni geom_eli"
  kld_list="${kld_list} fuse coretemp cpuctl"
If you find yourself in the situation that the ‘drm-next-kmod‘ would still not support your latest graphics card then you may try the latest version of the ‘drm-next-kmod‘. Current ‘drm-next-kmod‘ is on par with Linux 4.11 when it comes to graphics support, the latest WIP (work in progress) tree is at 4.15, so that may enable some graphics cards, anyway, here it is – https://github.com/FreeBSDDesktop/freebsd-base-graphics/tree/drm-v4.15-WIP – use at your own risk. 😉
X11 Window System Configuration
Historically You would create entire /etc/X11/xorg.conf file which would include complete X11 Window System configuration. Recently to comply with FreeBSD hier(7) directory structure and logic this can be also configured as /usr/local/etc/X11/xorg.conf file … and even more recently You can just configure these parts of X11 server that You need without touching other parts. This ‘individual’ configuration is done in the /usr/local/etc/X11/xorg.conf.d directory with individual files for each setting, like card.conf for graphics card configuration.
As the latter method is the most modern one we will use that in this guide for the sake of future installations.
# cat /usr/local/etc/X11/xorg.conf.d/flags.conf
Section "ServerFlags"
  Option "DontZap" "off"
EndSection
The DontZap option is to enable the X11 server abort with [CTRL] + [ALT] + [BACKSPACE] shortcut. I found it useful several times when none other option worked. Only X11 server required restart. I could of course login to this laptop via SSH and kill needed processes, but I do not carry two laptops with me to be prepared for such situations 😉
Next we will configure the keyboard with Polish layout and two additional options, terminate:ctrl_alt_bksp to allow termination of the X11 server with [CTRL] + [ALT] + [BACKSPACE] shortcut and ctrl:nocaps to ignore the Caps Lock key as I also find that useful, if you not, then do not enable that option.
# cat /usr/local/etc/X11/xorg.conf.d/keyboard.conf
Section "InputDevice"
  Identifier "Keyboard0"
  Driver "kbd"
  Option "XkbLayout" "pl"
  Option "XkbOptions" "terminate:ctrl_alt_bksp,ctrl:nocaps"
EndSection
The last one is the graphics card configuration, we will put ‘intel‘ here as our graphics is fully supported by it.
# cat /usr/local/etc/X11/xorg.conf.d/card.conf
Section "Device"
  Identifier "Card0"
  Option "DPMS"
  Driver "intel"
EndSection
We will also enable DPMS to save power when its possible.
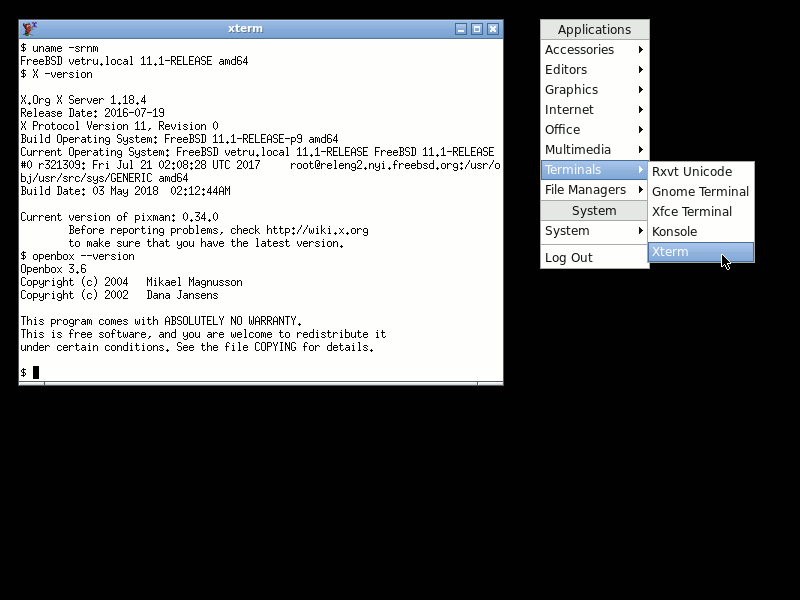
XDM or XINIT/STARTX
You will also have to decide how You want to start your X11 Window Server, you may login in plan text console and then type xinit(1) or startx(1) to read your ~/.xinitrc configuration and daemons or You may want to use X11 Login manager such as xdm/sddm/slim with ~/.xsession configuration to load after successful login. The difference between xinit and startx is that startx command executes xinit command with arguments like -nolisten tcp to not listen for the external connections for example. Its pointless to start another layer of binary (startx) just to pass an argument to command, so we will omit startx and go directly to xinit command with suitable alias.
Which is better – some login manager or directly starting X11 with xinit? Both are good, it only depends on your preferences. For example I used text login and then typed ‘x‘ as an alias to xinit command and recently switched to xdm along with symlink of ~/.xsession which leads to the very same ~/.xinitrc file and also like it.
When I use xinit to directly start the X11 server I use an alias to xinit with these parameters:
alias x='xinit ~/.xinitrc -- -dpi 75 -nolisten tcp'
Of course I keep that alias in the ~/.zshrc file (for the ZSH shell) so everytime I login in the text console I just type ‘x‘ and X11 session starts reading contents of my ~/.xinitrc file.
While xinit run commands based on the ~/.xinitrc file the XDM login manager looks for the ~/.xsession file. As You will be loading same stuff regardless of the startup method we will create a link of ~/.xsession pointing to the ~/.xinitrc file. This way either method You choose You will always end with started X11 session.
% ln -s ~/.xinitrc ~/.xsession

% ls -l ~/.xsession
lrwxr-xr-x  1 vuk  vuk  8 2018.05.22 00:27 .xsession -> .xinitrc
One more case about the ~/.xinitrc (or ~/.xsession) file. It is interpreted as a shell script (and yes you can do if/then/else/fi and case/esac or for/while POSIX shell scripting in it) but it does not need to be executable. The last command in this file MUST NOT to be put in the background (must be without the & char at the end) because the X11 session will end.
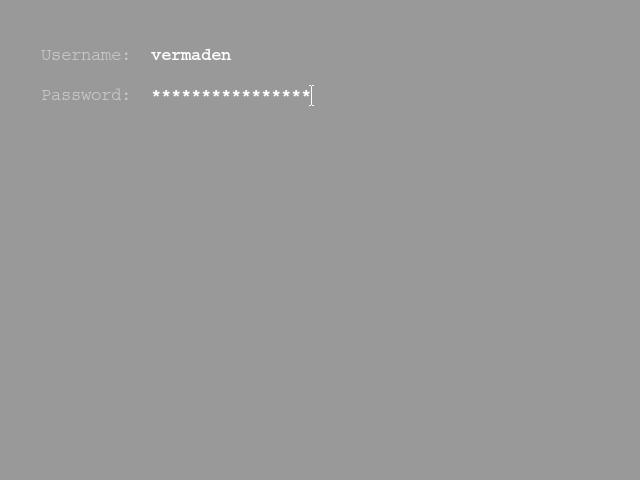
XDM Black Theme
I prepared two nice looking themes for XDM login manager, the first one uses black background and grey/white fonts.
To configure this black XDM theme You will need to modify contents of two files as show below.
# cat /usr/local/etc/X11/xdm/Xsetup_0
xsetroot -solid black
This we will set black background on the login screen on the :0 X11 server – the default one.
# cat /usr/local/etc/X11/xdm/Xresources
xlogin.Login.greeting:
xlogin.Login.unsecureGreeting:
xlogin.Login.fail:                Fail.
xlogin.Login.changePasswdMessage: Change.
xlogin.Login.namePrompt:          Username:
xlogin.Login.passwdPrompt:        Password:
xlogin.Login.echoPasswd:          true
xlogin.Login.background:          black
xlogin.Login.foreground:          white
xlogin.Login.failColor:           #cccccc
xlogin.Login.inpColor:            black
xlogin.Login.promptColor:         #aaaaaa
xlogin.Login.face:                courier:size=13:style=Bold
xlogin.Login.failFace:            courier:size=13:style=Bold
xlogin.Login.promptFace:          courier:size=13:style=Normal
xlogin.Login.greetFace:           courier:size=13
xlogin.Login.width:               400
… and the rest of the XDM login manager configuration is kept in the Xresources file, at least the appearance part 😉
Wonder what font will be chosen when we put ‘courier‘ in the *face options? Lets check with fc-match(1) command.
% fc-match courier
c0419bt_.pfb: "Courier 10 Pitch" "Regular"
You have the answer, You do not always have to type whole font name in the configuration files.
Here is the screenshot of this black theme in action.

XDM Grey Theme
If You did not liked the black XDM theme maybe the grey one will suit your taste better.
# cat /usr/local/etc/X11/xdm/Xsetup_0
xsetroot -solid gray50
We will use the gray50 predefined X11 server color for the background.
# cat /usr/local/etc/X11/xdm/Xresources
xlogin.Login.greeting:
xlogin.Login.unsecureGreeting:
xlogin.Login.fail:                Fail.
xlogin.Login.changePasswdMessage: Change.
xlogin.Login.namePrompt:          Username:
xlogin.Login.passwdPrompt:        Password:
xlogin.Login.echoPasswd:          true
xlogin.Login.background:          gray50
xlogin.Login.foreground:          white
xlogin.Login.failColor:           #dddddd
xlogin.Login.inpColor:            gray50
xlogin.Login.promptColor:         #cccccc
xlogin.Login.greetColor:          gray50
xlogin.Login.promptColor          gray50
xlogin.Login.hiColor              gray50
xlogin.Login.shdColor             gray50
xlogin.Login.face:                courier:size=13:style=Bold
xlogin.Login.failFace:            courier:size=13:style=Bold
xlogin.Login.promptFace:          courier:size=13:style=Bold
xlogin.Login.greetFace:           courier:size=13:style=Bold
xlogin.Login.frameWidth:          0
xlogin.Login.innerFramesWidth:    0
xlogin.Login.sepWidth:            0
xlogin.Login.width:               32768
xlogin.Login.height:              32768
xlogin.Login.x:                   0
xlogin.Login.y:                   0
… and knowing the XDM theming limitations we will customize to mimic the fullscreen of grey color. The only downside of that approach is that Username: and Password: fields will be placed in the top/left side of the screen.
Here is the screenshot of this grey theme in action.
Client Configuration
Last but not least, we will configure the simple ~/.xinitrc file with Openbox window manager, prestarted xterm terminal and black background for our simple session.
Here are the contents of the ~/.xinitrc file (to which ~/.xsession links of course).
% cat ~/.xinitrc
# SET PROPER locale(1) with LC_ALL VARIABLE.
  export LC_ALL=en_US.UTF-8

# PRESTARTED APPS
  xterm &
  xsetroot -solid black &

# WINDOW MANAGER
  openbox
It will not be very pretty – yet – but we will cover that later in the series.
That’s all for today’s X11 configuration, hope that was useful.
UPDATE 1 – The devd(8) Backend and AutoAddDevices Option
As user seschwar on Lobsters suggested:
“Xorg now has a devd(8) backend it can use to get informed about hotplugged devices instead of hald(8): https://lists.freebsd.org/pipermail/freebsd-x11/2017-March/018978.html That’s working fine for me, even without moused(8).”
Thank you for that information, this may be also verified by checking the X11 log /var/log/Xorg.0.log file.
# grep devd /var/log/Xorg.0.log
[ 96890.425] (II) The server relies on devd to provide the list of input devices.
        If no devices become available, reconfigure devd or disable AutoAddDevices.
[ 96890.955] (II) config/devd: probing input devices...
[ 96890.955] (II) config/devd: adding input device (null) (/dev/kbdmux)
[ 96890.956] (**) Option "config_info" "devd:kbdmux"
[ 96890.960] (II) config/devd: kbdmux is enabled, ignoring device ukbd0
[ 96890.960] (II) config/devd: kbdmux is enabled, ignoring device atkbd0
[ 96890.960] (II) config/devd: adding input device (null) (/dev/sysmouse)
[ 96890.961] (**) Option "config_info" "devd:sysmouse"
[ 96890.962] (II) config/devd: device /dev/ums0 already opened
[ 96890.962] (II) config/devd: device /dev/psm0 already opened
I will modify the original post to not confuse future readers.
UPDATE 2 – Using modesetting Driver
As user alx82 on Reddit suggested:
“If you use i915kms kernel module, you don’t need to install xf86-video-intel, the modesetting generic DDX driver that is built in the X server, will do just well. The xf86-video-intel might even cause you troubles, as you mentioned, for example my x230 was rebooting instead of suspending when I had installed the xf86-video-intel (I had installed it to solve the tearing problem with xfwm4 using the xf86-video-intel’s SNA acceleration). Now removed, my x230 suspends no problem.”
Thank you for that information.
I have tried below configuration with ‘modesetting’ driver and it works without a problem. I did not had any issues with ‘intel’ driver either but I will stick with ‘modesetting’ driver for a while see how it behaves on my machine.
# cat /usr/local/etc/X11/xorg.conf.d/card.conf
Section "Device"
  Identifier "Card0"
  Option "DPMS"
  Driver "modesetting"
EndSection
# cat /usr/local/etc/X11/xorg.conf.d/flags.conf
Section "ServerFlags"
  Option "DontZap" "off"
EndSection
# cat /usr/local/etc/X11/xorg.conf.d/keyboard.conf
Section "InputDevice"
  Identifier "Keyboard0"
  Driver "kbd"
  Option "XkbLayout" "pl"
  Option "XkbOptions" "terminate:ctrl_alt_bksp,ctrl:nocaps"
EndSection
To verify which driver You use You can check the X11 log /var/log/Xorg.0.log file.
Here is ‘intel‘ driver being used:
# grep -c intel /var/log/Xorg.0.log
98

# grep -c modeset /var/log/Xorg.0.log
8

# grep DRI /var/log/Xorg.0.log
[ 95305.483] (II) intel(0): [DRI2] Setup complete
[ 95305.483] (II) intel(0): [DRI2]   DRI driver: i965
[ 95305.483] (II) intel(0): [DRI2]   VDPAU driver: va_gl
[ 95305.484] (II) intel(0): DRI2: Enabled
[ 95305.484] (II) intel(0): DRI3: Disabled
[ 95305.549] (II) GLX: Initialized DRI2 GL provider for screen 0
Here is ‘modesetting‘ driver being used:
# grep -c intel /var/log/Xorg.0.log
0

# grep -c modeset /var/log/Xorg.0.log
80

# grep DRI /var/log/Xorg.0.log
[ 95556.446] (II) glamor: EGL version 1.4 (DRI2):
[ 95556.671] (II) modeset(0): [DRI2] Setup complete
[ 95556.671] (II) modeset(0): [DRI2]   DRI driver: i965
[ 95556.671] (II) modeset(0): [DRI2]   VDPAU driver: i965
[ 95556.714] (II) GLX: Initialized DRI2 GL provider for screen 0
UPDATE 3 – Using Dedicated video: Login Class Instead of Global One
As Lorenzo suggested in the comments below.
“If you modify /etc/login.conf, you are modifying the systemwide locale for the default login class to which all users belong (also user www for Apache, for example).”
We can of course created dedicated login class for the X11 Window System, as we use group video already we will create video: login class for the X11 Window System.
I assume that the default: login class is untouched – if You already modified it with lang and charset options, remove them.
Add this login class to the /etc/login.conf file.
video:\
        :charset=UTF-8:\
        :lang=en_US.UTF-8:\
        :tc=default:
Rebuild the login class database.
# cap_mkdb /etc/login.conf
How the account looks before setting the login class.
# grep vuk /etc/master.passwd
vuk:{REMOVED}:1000:1000::0:0:vuk:/home/vuk:/bin/sh
Lets set the login class to video for the vuk user.
# pw usermod -L video -n vuk
How the account looks after setting the login class.
# grep vuk /etc/master.passwd
vuk:{REMOVED}:1000:1000:video:0:0:vuk:/home/vuk:/bin/sh
Now logout and login again to make that work.
Hope that helps.
UPDATE 4 – Tap to Click on Synaptics Touchpad
After upgrade FreeBSD from 12.1-RELEASE to 12.2-RELEASE the tap to click on (not only mine touchpad on ThinkPad W520 machine stopped working.
There is also option called NaturalScrolling which enables the natural scrolling mode. It means that if you use two fingers to slide up on the touchpad the content of the window will move up (like scrolling down with mouse).
The ‘not’ natural scrolling mode means that sliding two fingers up on the touchpad will move the content of window down (like scrolling up with the mouse).
After some time I fell that natural scrolling is more … natural/logical for me so I switched to it.
Below configuration fixes that and tap to click works again.
# pkg install xf86-input-synaptics

# cat << BSD > /usr/local/etc/X11/xorg.conf.d/touchpad.conf
Section "InputClass"
  Identifier "touchpad"
  MatchIsTouchpad "on"
  Driver "libinput"
  Option "Tapping" "on"
  Option "NaturalScrolling" "on"
EndSection
BSD
After these steps restart the X11 server and tap to click should work properly again.
Hope that helps.
UPDATE 5 – VAAPI and Tear Free on Intel Cards
The VAAPI is also known as Video Acceleration API – its open source API that allows applications such as mpv(1) or vlc(1) media players to use hardware video acceleration capabilities – usually provided by the GPU.
About Tear Free option … some people praise Wayland as tear free experience … well guess what you can have the same on X11 too. It will provide at most 1 frame of latency to the X11 output while using little more memory for additional copying but besides that nothing changes. The input latency does not change.
Here is the detailed information about Tear Free from Intel.
Disable or enable TearFree updates. This option forces X to perform all rendering to a backbuffer prior to updating the actual display. It requires an extra memory allocation the same size as a framebuffer, the occasional extra copy, and requires Damage tracking. Thus enabling TearFree requires more memory and is slower (reduced throughput) and introduces a small amount of output latency, but it should not impact input latency. However, the update to the screen is then performed synchronously with the vertical refresh of the display so that the entire update is completed before the display starts its refresh. That is only one frame is ever visible, preventing an unsightly tear between two visible and differing frames. Note that this replicates what the compositing manager should be doing, however TearFree will redirect the compositor updates (and those of fullscreen games) directly on to the scanout thus incurring no additional overhead in the composited case. Also note that not all compositing managers prevent tearing, and if the outputs are rotated, there will still be tearing without TearFree enabled.
To achieve this we will need to add these two packages:
# pkg install libvdpau-va-gl libva-intel-driver
The vlc(1) media player does not need any configuration to use VAAPI. It will just ‘pick it up’ automatically.
% vlc VIDEO.mp4
(...)
libva info: va_openDriver() returns 0
(...)
To use VAAPI in mpv(1) you will need to add hwdec=vaapi option in the ~/.config/mpv/mpv.conf config file.
% cat << MPV >> ~/.config/mpv/mpv.conf
hwdec=vaapi

MPV

% mpv VIDEO.mp4
(...)
Using hardware decoding (vaapi).
(...)
Above terminal outputs from mpv(1) or vlc(1) media players will let you know that they are using VAAPI successfully.
Lets get back to Intel Tear Free option – when enabled – will be shown as follows in the /var/log/Xorg.0.log file.
% grep -i tear /var/log/Xorg.0.log
[  6356.991] (**) intel(0): Option "TearFree" "true"
[  6356.993] (**) intel(0): TearFree enabled
To enable it use the following X11 config for the graphics card.
% cat << X11 > /usr/local/etc/X11/xorg.conf.d/card.conf
Section "Device"
  Identifier "Card0"
  Driver "intel"
  Option "TearFree" "true"
  Option "DPMS"
EndSection

X11
After these steps restart the X11 server to make these changes work.
Also a note about the Tear Free option. I do not recall any tearing before enabling it so I generally do not see any ‘benefit’ of enabling it, but maybe its just me. I have read that some people see noticeable difference (for the good) when they enabled the Tear Free option.
Regards.
